Please be aware that some of the links on this website are affiliate links. This means that if you click on a link and make a purchase, I may receive a small commission at no additional cost to you. Your support through these links helps to maintain and improve this website. I only recommend products or services that I believe will add value to my readers. All opinions expressed are my own. Thank you for your support!
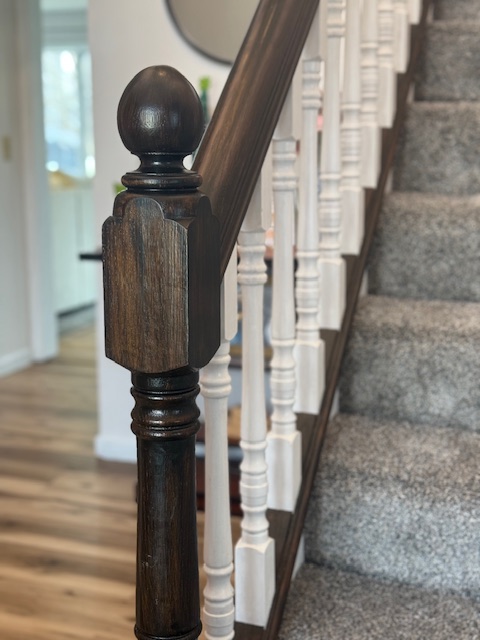
This was the latest big project I did for our house. I say big because it is time-consuming and has multiple steps to finish it. While I love to update a room with paint, I don’t consider that to be a big project. It was fun to get this one finished and see it some together. When we moved into our house, it was a very ’80s house, and while that is not a bad thing, I wanted to update it all to look brighter. I love the 2 tone banisters and how they look. So I went to the internet and researched the steps to take and tips to help me get through this project.
I woke up one day just knowing that it would be the day to start this project. My little guy was at school for the morning, and I had a few hours to get it going.
Things you’ll need

-Bucket or bowl of soapy water
-Washcloth or rag
-Paper towels or Paint Rags
–Medium size paint brush and small paint brush
–Medium size foam brush and small size foam brush (get the packs that have multiple sizes)
-Paint
–Sealer (If stain doesn’t come with a sealer in it)
Latex gloves
Now, where to start?
The first thing we did was sand everything down. We used our sander and 180 grit sandpaper to get the big patches of wood done, the flat pieces on the rails, and then the long part on the banister. I then went through with 180 grit sand paper and did all the intricate details on the rails. You want to get rid of as much of the previous stain on top of the wood as possible. This was time-consuming and messy as the dust got everywhere. After the 180, I took a 220 grit sandpaper and repeated the whole process. The 180 was able to remove as much of the stain and seal that was previously on the wood, then the 220 was able to smooth it all down.
After sanding, you need to wipe all the wood down. Using the soapy water and the washcloth/rag, wipe down the banister and rails completely. This will remove any dust or debris still clinging to the wood. Wait for it to dry completely before continuing to the next step.
If needed, tape off the bottom and top of the rails where they meet the banister and step. This will help you have a clean line and you won’t need to be as careful going over the ends.
Grab your bonding primer and paint brushes. I would recommend starting at the top and bottom of each rail with the smaller brush and them using the medium brush to paint the rest of each rail. This is a thick primer, so it may be more difficult to work with than regular paint. Follow directions on can for how long to wait for dry time. Some primers vary for drying time.
It’s time to paint! Once you have the paint and brushes ready, just use the same steps you took to add the primer to the rails. I did 2 coats and waited 3 hours after the first coat to apply the second coat.
I waited until the paint was fully dry before I started the stain; I didn’t want to bump it and smudge the paint. Once you are ready to apply the stain, grab your foam brushes, stain, and gloves.
Be careful using a stain, it doesn’t come out of things as easily as paint can. Using a small foam brush, start by applying the stain where the rails meet on the underside of the banister. Then, use it to get any small or intricate areas on the railing. I switched to a medium foam brush when I was ready to do the large part of the banister. I applied 1 coat at a time, then let it dry overnight before applying a second coat, and waited 24 hours before applying a sealant over the stain.
It’s Finished!

I was very excited with how it came out. I felt like it brightened the space up and was very welcoming when you enter in through the front door. Now, as I am sitting here today, we are getting a new carpet installed, finally! Our house feels like ours, and it took a lot of work to get things changed around. I’ll still have projects of things I want to change, and you’ll get updates for those. Whenever you have a project you are working on, remember to be patient and enjoy each step as you go. I was able to listen to an audiobook and podcast while working on this project. It made the time go by quickly and helped me stay focused. If you decide to tackle a project like this, good luck!
Check out more posts here. Leave a comment.

